
Now that the craft fair is truly over, I'd like to do a series of posts on craft fairs. I'll kick things off with FIVE booth display starter tips to help newbies like me get started with your very first craft fair! (I hope you're excited as I am!)
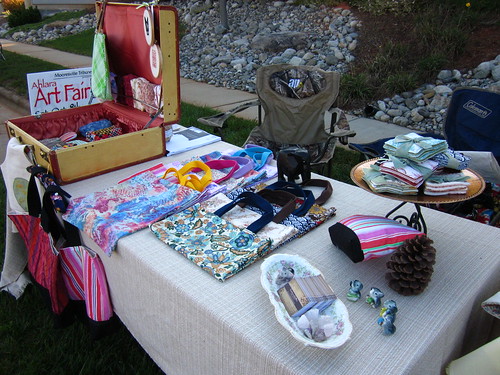
So here is my set up for the craft fair!
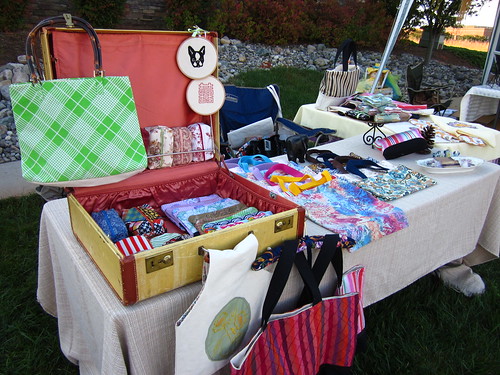
1. Plan your layout.
Is your craft fair organizer providing anything? Some organizers provide tables or display cases, but for this one, I was not provided with anything. I decided to use 2 tables and arranged them in an L-shape. Check to see the amount of items you are selling to decide on how much space you need. I didn't have very many items to sell, so I used only one long table and one shorter table. You might want to think about a backdrop if you sell items that need to be hung. If you have a tent, you can string up lines across the four pillars for additional display options.
2. Decide on your color scheme.
You'll want to choose a background that best shows off your items for sale. Plain, neutral backgrounds would show off colorful items well, but brightly colored backdrops (whether it be the table cover or a backdrop) would be eye-catching and capture the attention of passers-by too.
My items were of a variety of colors so I had decided from the get-go that I would choose a neutral base color. I was deciding between unbleached muslin and a creamy upholstery fabric I had thrifted from a while back. I picked the latter because it made more sense cost-wise to use the cheaper fabric. Also the creamy fabric is much thicker than the muslin. It hangs well over the table and upholstery fabric is, in general, made to withstand wear and tear. I could reuse the same fabric for future fairs.
3. Play around with different heights and depths
Take away the monotony of a flat level display by making use of stands or placing boxes on top of each other to create different heights. Stack crates together or stand them on their sides, use fabric to create folds to give an illusion of depth. Rearrange your items or group them differently to see the variety of effects you can achieve.
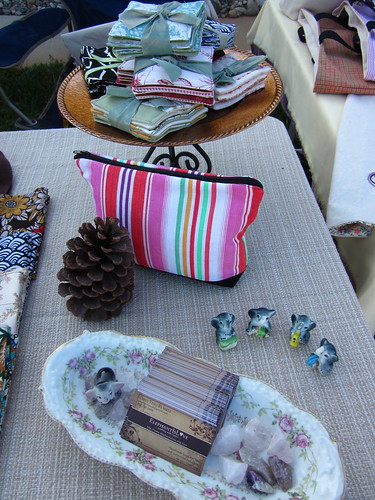
I already had in mind to use a cake stand to display my sets of coasters. Except that I didn't have a cake stand, and I didn't have time to go thrifting for one. So I picked a pretty bronze plate from the kitchen and taped an ornate candle holder to the bottom. I piled my coaster sets on top of the bronze plate-turned-stand to give that additional height. That did the trick. (See picture below)
4. Have fun with props!
Use unconventional items to showcase your items. Besides catching the attention of otherwise uninterested patrons, they also double up great conversational starters.
I googled craft fair display ideas and seen that somebody had made use of a vintage trunk for an alternative display case and I was thrilled!! I had thrifted a cute mustard yellow suitcase a while ago so I decided to include that! Besides, it makes an easy pack-up-and-go option. When my fair was done, it was a breeze to just load up my suitcase and go!
I chanced upon another vintage dish in the kitchen. I love the pretty flowers and just had to find a way to include it into my display. My business cards came into mind. I placed the cards in the middle, threw in a few quartz crystals i picked when I went gem mining, and voila! Pretty dish - check! Quartz crystals - check!
And as the name of my shop is Elephant Is Love, I just had to include my eclectic elephant collection. I picked out my set of 5 ceramic elephants and my wooden elephant. These babies were the focus of my display! I think they garnered more attention than my items. I wasn't disappointed though, they helped draw the attention of passers-by and I was proud of my collection. People were appreciative of the effort I put into my display and I even got to talk to a few fellow elephant lovers!!
Finally, I threw in the huge acorn I picked from the Asheboro Zoo a year ago. I was so glad to see how they all came together so nicely!
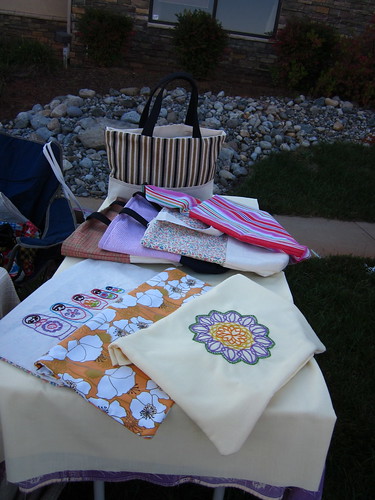
5. Have at least one of each of your different items fully displayed.
Make sure every type your product is well represented and clearly displayed so shoppers know exactly what to expect.
I had different types and sizes of bags and pouches for sale, so I made sure for every type of bag/pouch, I displayed at least one standing upright.
I'm still not 100% happy with this display, and plan to rework this. Any suggestions??
My only real anxiety were my bigger tote bags. In my opinion, these bags would look better if they were hung up instead of laid flat on the table. I had grand plans of cutting up a peg board to build a triangular stand, but it involved too much time, cost and logistics. Then I thought if I could borrow a coat rack that would solve the problem. But nope, no such luck. At that very moment, my lovely neighbor came to my rescue and gave me a decorative fabric wrapped hanger. I hooked it on the open suitcase and hung three bags on that.
Booth display complete and I was very
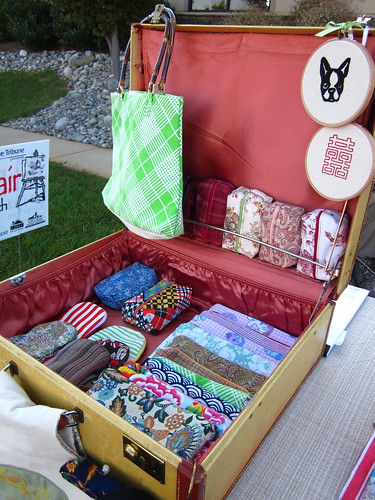
Trunk display close up!
And here's a better view of the hanging bags just below the trunk.
Hope this will help some of you out with your booth display too! Feel free to throw some ideas my way. I completely enjoyed myself and thank the heavens we had beautiful perfect weather. Tents weren't provided and I was crossing my fingers (and toes) that it wouldn't rain. In fact, I got a pretty nice tan sitting out in the sun! Win-ning!!!! :)
In my next post I will talk about my experience and lessons learnt after the craft fair. But be patient as I am still recovering from all that hullabaloo!
Have a great week!
Stopping by from Glo Sews Versatile Blogger Award post. I love your set up that is very cute. The trunk is an awesome display.
ReplyDeleteTwo Boys on the Run
Your display looks awesome :)
ReplyDeleteLove the trunk/suitcase idea! Your display looked great!
ReplyDeleteYour display looks fantastic! Much nicer than my first craft show display. One thing I have learned is that I will forever be changing my display set up:)
ReplyDeleteEven tho' I've done so many craft markets, I'm so bad and not confident at display esp when I see how everyone else is so good at it. You have put so much thought into yours. I just do mine haphazardly often getting much criticism from me hubs.
ReplyDeleteLove these: the suitcase, cake stand, name card dish
Suggestions: If you have several bags (same kind) displayed flat, have one fluffed out with stuffing and let it sit.
I have similar anxieties about my large bags too. I looked for a brand signboard in the pics but couldn't find any. Are you just relying on the namecards?
One thing I learnt is most customers don't look beyond the first 60-70cm of a table's width. Beyond that, the items need to be placed at a height. This is true when the table is small and you have many items.
Btw, great job for a first time.
These are great tips! I've never actually run my own booth at a craft fair, but I do go to them frequently. I love the idea of using the suitcase :)
ReplyDeletethis is super, super helpful! thank you for posting this. i'm dying to do a booth, and i've spent a lot of time looking at those of fellow crafters. i'm bookmarking this for future reference :) hooray!
ReplyDeleteGreat post! I've linked it on my Monday 'start your week off with..' feature.
ReplyDeleteLauren
http://tasteslikelove.blogspot.com
Love the suitcase!
ReplyDelete