Showing posts with label quilting. Show all posts

Tuesday, December 11, 2012

Crafting : Scrapbuster Pinwheel Quilt

Today I'm going to share my next December craft - a square lap quilt for cosy nights, hot chocolate and reading by the fire!

In this quilt:

1. I tried out the traditional pinwheel quilt pattern.
2. I made my own binding (2nd to date!)
3. Attempted mitered corners!
4. I refined my quilting techniques such as minimizing bunching up as I laid out my quilt sandwich.
5. This project is a good scrap buster! I used up a good bit of my scrap fabric lying around.


IMG_8007

Assembling the pinwheel squares:

1. I cut out 72 pieces of 3 7/8" squares of plain fabric and 72 pieces of 3 7/8" squares of printed fabric.

2. Take one plain square and one printed square and align them with right sides facing.

3. Draw a diagonal line on one of the wrong sides of this pair of fabric.

4. Sew 1/4" away on both sides of this diagonal, and then cut the fabric down the diagonal.

You should get 144 squares made up of one plain and one printed fabric. This is your basic block. Now arrange them to your taste by putting 4 blocks together to create a pinwheel block, like the ones pictured above. You should end up with 36 pinwheel blocks.


IMG_8010

Now to assemble the quilt top (all with 1/4" seam allowance):

1. Stitch 6 pinwheel blocks in a row. You will have 6 rows.

2. Then stitch the rows together. You will end up with a square quilt top, 6 blocks by 6 blocks.


And then assemble the quilt by laying the batting between the quilt top and the quilt backing, like a sandwich. The quilt top and quilt backing should have their right sides facing out.

I've learnt from past experiences to safety pin my quilt sandwich at regular intervals, all over the quilt, to prevent the batting from bunching up on the inside.

When you are sure you got your quilt sandwich laid out as flat as you possibly can, you can proceed with stitching the sandwich together to secure the batting in place.
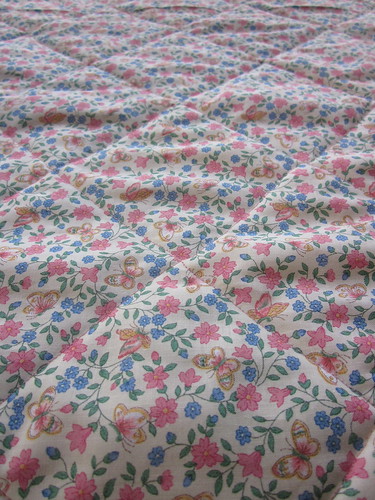
IMG_8019

I have chosen to stitch-in-the-ditch by sewing over the existing stitches of my blocks, so it looks like this on the back.


IMG_8031

Align and pin the binding so the raw edges meet the edges of the top of the quilt. Start the binding on one side of the quilt, but in the middle. Leave a tail of about 5" to 8" on both ends, but leave about a 3" gap between the binding tails. Like in the picture above.


Here I'm going to attempt to explain how I miter my corners. Remember this is my first attempt:
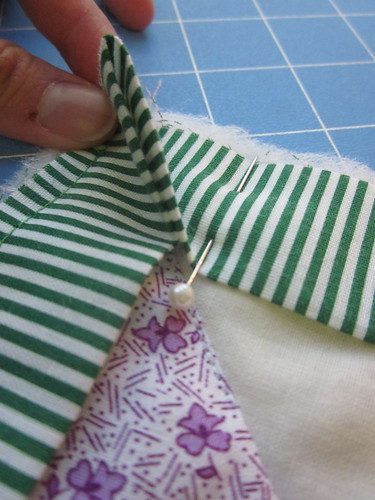
IMG_8034

When pinning the binding to the quilt top, leave an excess triangle when you come to a corner. This will give you enough binding to work with when you flip the binding over to the back of the quilt. Pretend you are pinching a triangular corner.

Once the pinning is done, sew the binding to the quilt top with a 1/4" seam allowance. When you reach the end, lay the two tails flat on the quilt and mark where the two ends meet. Sew the binding together (not on the quilt) at the mark, and trim off excess. Then sew the binding onto the quilt, like before, with a 1/4" seam allowance.

Trim excess batting bulk before turning the binding to the other side. I find pressing the seams as I flip the binding helps a lot!
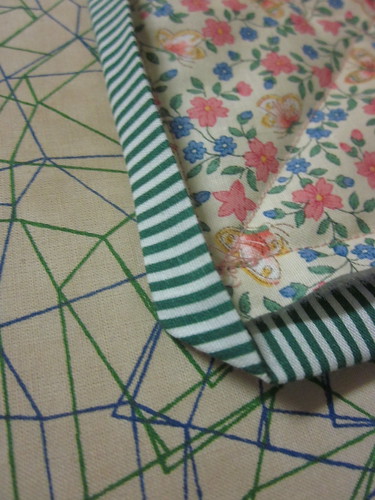


IMG_8037
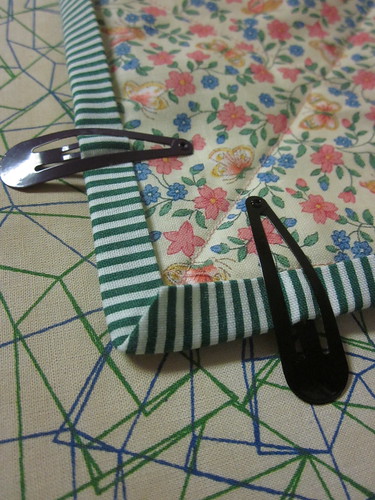
Here's how I attack the corners. Attempt one side of the quilt at a time!
Press and fold one side of the binding down first.
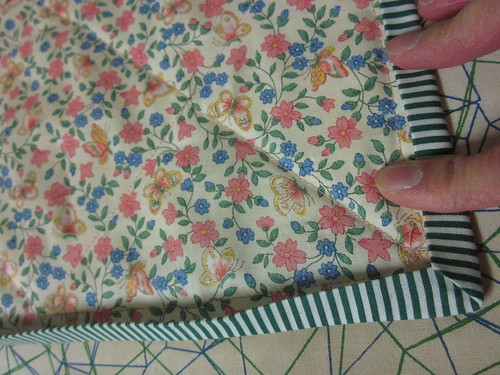


IMG_8038
Then press and fold the other side down. It should fall in place nicely!


IMG_8039
Secure with binding clips ( or in my case, hair clips!) Then carefully hand sew, with slip-stitching, the binding to the back of the quilt!

IMG_8042

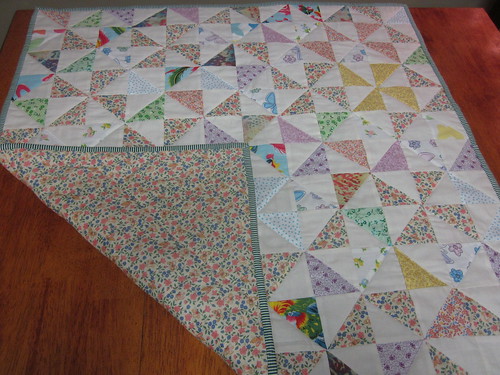
Ta-daa! I'm ready for the cold winter nights!


Linking up to some crafty fun here!


Tuesday, September 4, 2012

Crafting: Elmer the patchwork elephant Inspired Quilt

Sorry for the long absence!

I have been focusing on my upcoming vacation, and all the projects I was supposed to have done, but procrastinated.

Here's one such project: my friend S ordered a twin-sized quilt from me about four months ago, and one week before I leave for Singapore, I get my ass down to doing it. She wants to gift this quilt to a friend who loves elephants like I do! S told me to design the quilt with Elmer the elephant in mind. I didn't want to make it too childish as it is a quilt for an adult. But Elmer is a patchwork elephant, I have to make a patchwork quilt! The more colors the merrier!! I just hope it's not going to be too heavy. I have to pack it into my luggage.


IMG_6942

Day 1 of the Labor Day weekend:
Frantically cutting squares into triangles, only to piece them back into squares again.
I have a vague sense of futility...


IMG_6914

Day 2: First quadrant. And then 5 more.


IMG_6949

Day 3 : Quilt top is finally done. I have to go get some batting tomorrow, and some more fabric for the back of the quilt before this is completed.

I used Michael Miller's Fairy Frost Collection of 50 different colors. No, I didn't go out and buy 50 bolts of different colors. Thank goodness for Etsy, I bought 4 packs of quilting squares, all nicely cut up for me to use!


But for now, time for some well deserved rest. I need to get back to reading my very exciting Girl With the Dragon Tattoo.

This has been one intensive Labor Day (pun totally intended, *guffaws*)


What did you do this Labor Day weekend folks?


Saturday, March 10, 2012

Crafting: Now THIS is a PROPER quilt!

Photobucket


My ex-boss had a baby girl on Leap Year Day! So she deserves something special!!

This is my third baby blanket, but the first with quilting as well as binding. And can you believe I made my own binding??? I couldn't believe it either, but I was surprised to find it wasn't rocket science.


Photobucket


I know it's not the traditional baby girl pink, but who can resist those cute Matryoshka dolls??

Sunday, February 26, 2012

Crafting: Quilting adventures

Here is my quilting story.


My friend S is having her baby shower next week. She is an awesome co-worker and a dear friend whom I've grow close to. She once mentioned that she really loves and appreciates handmade gifts. I felt bad when I gave her a store bought maternity wrap-around sweater for Christmas, even though it was a lovely one. I had planned on making her a Christmas gift, but who knew time flew by so quickly. I wasn't able to make anything for her in time.

I swore I would present her with at least one handmade item by me. So as the date for the baby shower drew near, I decided to try making a baby quilt for her little boy.

I went on the Fat Quarter Shop to pick out a set of cute fabrics for the quilt. There were so many to choose from, before I knew it, I had at least a dozen picks on my wish list. But I finally settled on this set.

The British Are Coming Fat Quarter Bundle, Michael Miller Fabrics


Then I cut them into 5" x 5" squares and spent the rest of the afternoon piecing the quilt puzzle together. This was the most frustrating part - trying to figure which configuration looks the best. After a while I went cross-eyed and had to step away for awhile before returning to the project.


Then came the sewing, which I thought was going to be painful. Turns out, it went quite smoothly. And I don't know what I did right, but all the rows were properly aligned! That was my worst nightmare. I was afraid after I put all the rows together, the squares wouldn't align. I think I really took special care to measure and cut as accurately as I can, and to draw out the seam lines before sewing. Sure, it took more effort, but it was worth it in the end, no frustrating out-of-line-pieces!

I added a border, then put the quilt top, batting and backing all together. That was the easy part. It's like making a coaster only 50 times bigger. :)

This is the front...


And that's the back - gingham!


I love the end result. Now I want to attempt an adult sized quilt, seeing how I ruined our quilt in the dryer (left it in too long, burned the insides, long story.... sigh).

And my awesome friend from Singapore has placed an order for a quilt already! This was even before she'd seen my first finished quilt! She just wants it to be ready by Christmas. CHRISTMAS?? Thank you for giving so much time to prepare and practise. How some people have so much faith in me I will never understand, but I really appreciate!! Love you, Shobs!


I can't wait to present this quilt. It makes me feel all fuzzy inside when I think that her baby boy is going to grow up with my blanket in hand, like this:


Thank you Nana Glo for the inspiration, and to Kim from the Fat Quarter Shop, I love your stuff!


I'm officially addicted.


Related Posts Plugin for WordPress, Blogger...