Showing posts with label halloween. Show all posts

Sunday, November 4, 2012

Crafting : Owl Wings and Mask tutorial

Here is a list of Halloween costumes I had in mind:

1) Gypsy fortune-teller
2) Geisha
3) Bird / Owl
4) Fairy


I had my heart set on making my fortune teller outfit, I even bought a caftan pattern from Etsy to make my outfit!! Then i chickened out of the pattern :(

But then i found this easy-to-make Owl wings tutorial on Burda Style, and I figured I could easily make an owl mask. So that was decided!
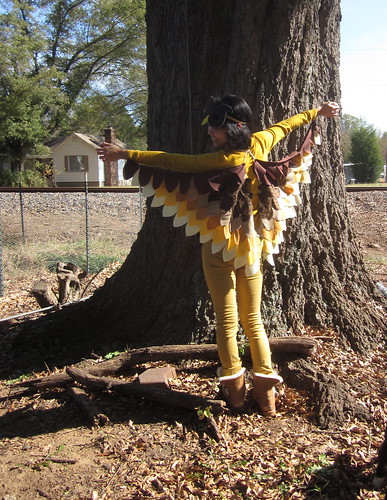

IMG_7821IMG_7825


To make the mask, you'll need:

2 pieces of brown felt
Scrap Yellow felt
1 piece of sturdy interfacing
Coordinating colors of embroidery floss
Embroidery needle
Hot glue gun
Head band


1. I drew a template of an owl mask, alternatively you can google owl mask templates,
or get one from the Martha Stewart website
Via

2. Trace the template on the brown felt and on the interfacing
to cut out three owl mask shapes. Like so.

IMG_7744


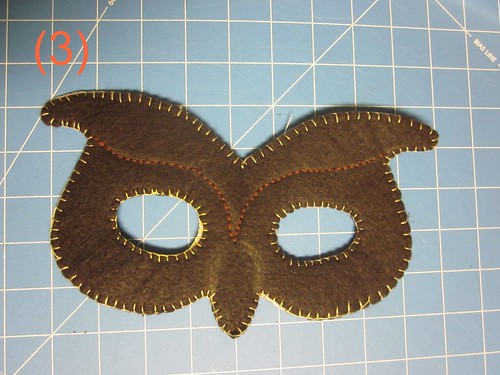
3. Sandwich the three layers so that the interfacing is in between the two pieces of brown felt. Pin the layers together.
Then thread your embroidery floss and blanket stitch the three layers together, all around the edges. I love using the blanket stitch because it a pretty stitch but it binds layers together very well! Functional and aesthetically pleasing.
I also used a running stitch to add a little outlining detail to the mask. You'll want to use a thicker needle and 6-count embroidery floss. Pushing the needle through 3 layers of felt and interfacing and be quite a challenge!
IMG_7746


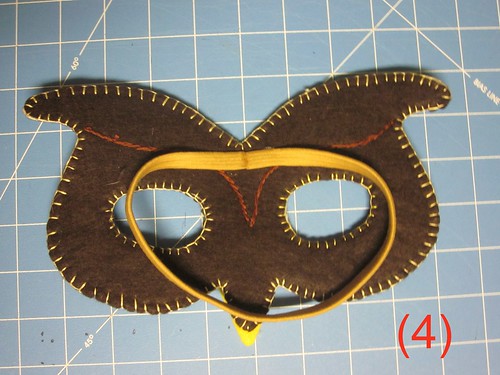
4. Attach the head band to the mask using a hot glue gun.
Press and hold head band in place until the glue dries.
Now, where you place your head band is a matter of personal preference.
I attached my band in the middle of the mask above the eye holes because after playing around with different placements, this was most comfortable for me.
You should experiment too, before permanently attaching the band to the mask.
IMG_7748


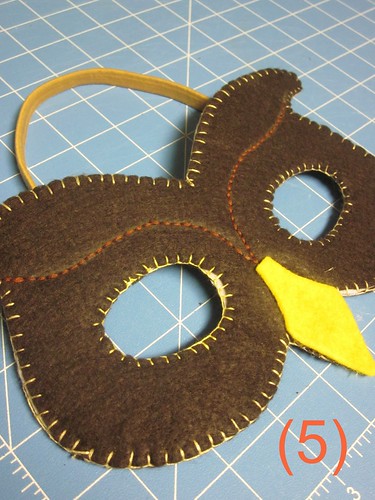
5. Cut out a diamond shaped beak from the yellow felt. Leave one of the edges slightly rounded or plateaued. Hot glue this piece onto the bottom of the mask where the beak goes. Ta-daaa!! And you're done!
IMG_7749


IMG_7823

Now go be a HOOT, and take someone under your wing! *guffaws*
(Insert your own owl joke here for laughs)
And I'll be the gypsy fortune teller next year!


Friday, October 19, 2012

Celebrations : Halloween Kiddy Cuteness!

Is it me or is Halloween just around the corner??

I just received an invite to a Halloween party and am scrambling to think up a costume right this minute. I had a few ideas months ago, but the procrastinator in me said "You know you'll get it done in a week, why worry now?"

Ok. It's time to start panicking... the party is in ONE week.


While doing research, the procrastinator got sidetracked (yet again).

And this is what she found...


via


via


via


via
I love this last series. The kids in the pictures have just the perfect expressions too. Frodo and Tintin are my favorites! So simple yet so clever!!

How are you dressing your kiddos this year?

Sunday, October 30, 2011

All things Halloween...

Here's a quick Sunday post:

It was dress up weekend,

IMG_4110

plus a pumpkin carving contest at the museum.

hermitcrab

All guests are invited to vote for their favorite pumpkin. I'm in team #3!!! We made a house for our hermit crab (based on Eric Carle's book) out of the pumpkin. Isn't it whimsical? And there actually is a LIVE hermit crab living in the pumpkin. Don't worry, it's getting food and water and a warm living environment. And so far we are getting all the girl votes...

monster

while pumpkin #2 is getting all the boy votes with their Monster Pumpkin Strikes Again!

toystory

Pumpkin #4 is getting all the Toy Story fan votes

drseuss

while Pumpin #1 the Dr Seuss fan votes.

I don't know about you, but I think the Woody pumpkin is some serious competition no?


Tallying the results at the end of today. I hope we win!!!


Thursday, October 27, 2011

Crafting: Halloween goodies and the Wonders of the Dollar Store!


I wanted to give out some Halloween goodies this year for my friends at work. But i am useless in the kitchen and at baking. So the simple candy crafts will have to do to! And I found these simple ideas on Pinterest! Too cute!

So i went to the Dollar Store and got some:

1) Lollipops and mints
2) White and black plastic table coverings
3) Fuzzy pipecleaners
4) Googly eyes
5) Glue gun

A $5 dollar craft? Hell, yeah!


Cut out squares of plastic table covering. For the spiders i cut out 3"x3" squares, and for the ghosts i cut out 6"x6" squares, and cut all my pipecleaners half in length.

IMG_4083

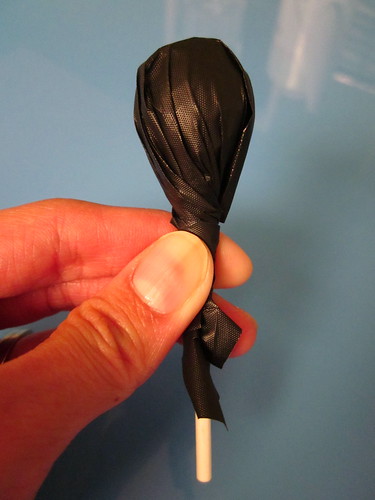
Wrap the plastic squares around the lollipops like so.

IMG_4085

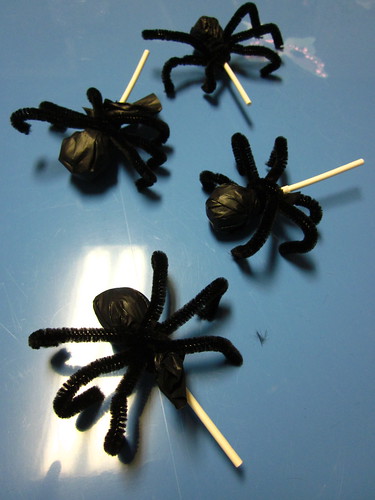
I don't even tape them up, I just wrap them tight with the pipecleaners. I use white for the ghosts, and 3 black half-lengths for the spider legs. I made a spider with 8 legs, but it looked too cluttered. The spider looked better with 6 legs, so maybe I'm just going to call them ants.

IMG_4091

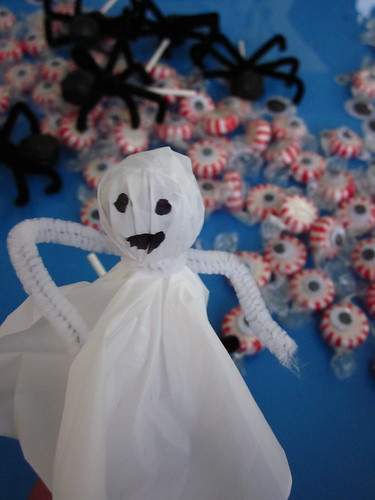
Use a sharpie to draw on features for the ghosts.

Voila, spiders and ghosts all done!

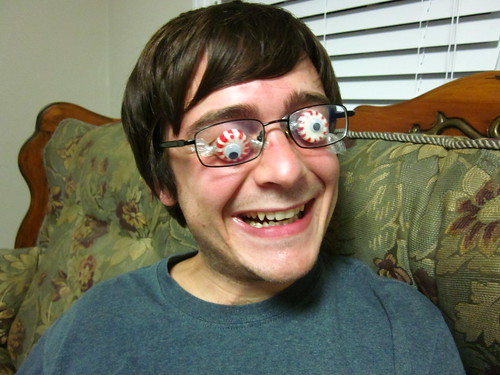
But waitaminute! There's more! I'd seen these mints at the dollar store and thought if i added some googly eyes on them, maybe i can turn them into bloodshot eyeball candies? So i whipped out my glue gun and stuck eyes on the mints. I'm going to add a sign that says "Have a ball!" *sniggers*

IMG_4095

You guys have a ball this weekend! Happy Halloween!!!


Related Posts Plugin for WordPress, Blogger...