
1) Gypsy fortune-teller
2) Geisha
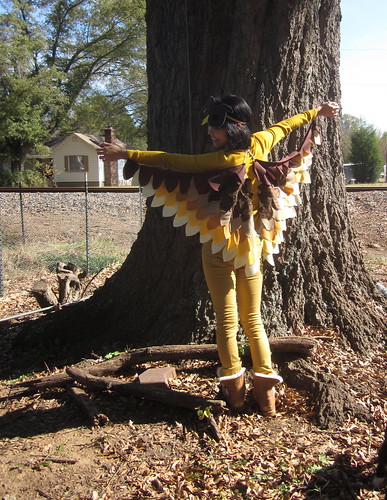
3) Bird / Owl
4) Fairy
I had my heart set on making my fortune teller outfit, I even bought a caftan pattern from Etsy to make my outfit!! Then i chickened out of the pattern :(
But then i found this easy-to-make Owl wings tutorial on Burda Style, and I figured I could easily make an owl mask. So that was decided!

To make the mask, you'll need:
2 pieces of brown felt
Scrap Yellow felt
1 piece of sturdy interfacing
Coordinating colors of embroidery floss
Embroidery needle
Hot glue gun
Head band
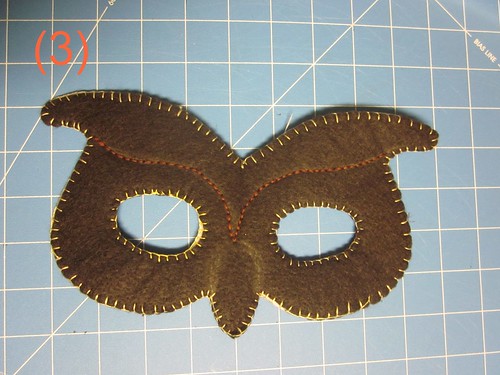
1. I drew a template of an owl mask, alternatively you can google owl mask templates,
or get one from the Martha Stewart website

2. Trace the template on the brown felt and on the interfacing
to cut out three owl mask shapes. Like so.

3. Sandwich the three layers so that the interfacing is in between the two pieces of brown felt. Pin the layers together.
Then thread your embroidery floss and blanket stitch the three layers together, all around the edges. I love using the blanket stitch because it a pretty stitch but it binds layers together very well! Functional and aesthetically pleasing.
I also used a running stitch to add a little outlining detail to the mask. You'll want to use a thicker needle and 6-count embroidery floss. Pushing the needle through 3 layers of felt and interfacing and be quite a challenge!
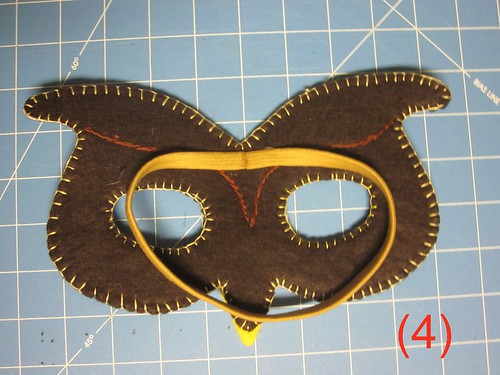
4. Attach the head band to the mask using a hot glue gun.
Press and hold head band in place until the glue dries.
Now, where you place your head band is a matter of personal preference.
I attached my band in the middle of the mask above the eye holes because after playing around with different placements, this was most comfortable for me.
You should experiment too, before permanently attaching the band to the mask.
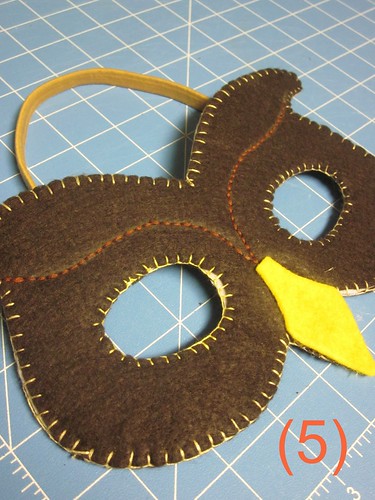
5. Cut out a diamond shaped beak from the yellow felt. Leave one of the edges slightly rounded or plateaued. Hot glue this piece onto the bottom of the mask where the beak goes. Ta-daaa!! And you're done!

Now go be a HOOT, and take someone under your wing! *guffaws*
(Insert your own owl joke here for laughs)
And I'll be the gypsy fortune teller next year!
how cute is this! :) i saw this on a little girl and thought how spectacular it would look in person! and it does on you too!!!
ReplyDeletedid you go trick or treating?
Ahhhhh super cute! I love the wings! Wondering if you can somehow turn them into a skirt...
ReplyDeleteVery, very, very cute. Thanks for sharing!
ReplyDelete-Heather
{heatheringheights.com}
ooh I just love this idea! I always end up planning my costume the day of, and don't have time to put something great together. I am going to save this for next year!
ReplyDeleteOh, this IS a hoot!! I love the stitching on the mask.
ReplyDeleteThis is SO cute! The stitching around the edges makes it really fun.
ReplyDeleteI have a slight owl obsession... I even have an owl iPod case :D So naturally, I love this costume! :) I think it's super cute and fun! x
ReplyDelete