Showing posts with label crafts. Show all posts

Monday, June 17, 2013

June 15 : From Above -- A day in Blowing Rock

June 15 : from above in the mountains #fmsphotoaday #mountains
Taken from above in the mountains!

This past weekend, my friends and I made a trip to Blowing Rock for Art in the Park. For one Saturday each month, from May through October, the town of Blowing Rock hosts this event that showcases about 90 artists, featuring handcrafted jewelry, pottery, paintings, photography and more!


Have you ever seen such a cute little bunch of #hummingbirds? Made from acorns and leaves!! #ilovehandmade #crafts
Here is a hummingbird mobile I found.
The birds are made of pinecones and leaves, how clever is that?!


Can I have one of these for my little birdies please? #crafts #birdhouses #handmade
A whole array of decorative (and possibly functional?) birdhouses,
dressed up with everyday objects like doorknobs and old license plates.


#magnolia wall painting I acquired today. I love it!  #flowers
This is the painting I bought to dress up my plain white walls. It is a painting of magnolias,
for the magnolia trees that flank the sides of our house. I love it!


Beautiful day to be out and about! #blowingrock
At the end of the day, we drove to Moses Cone Memorial Park to take an evening stroll in the park. It was such a beautiful day with skies so blue, we couldn't have asked for better weather!

I hope you had a great weekend!

Sunday, January 20, 2013

Where's Waldo Pub Crawl


Trying to break the Guinness World Records of 3657 Waldos in one place (Dublin, Ireland), the Epicenter in Uptown Charlotte hosted it's annual Where's Waldo pubcrawl last night.


My friend celebrated her birthday this weekend, so we decided to join in the Waldo-mania.

I had dressed as Waldo one Halloween, and still owned the striped top, stripey socks and glasses from a few years back. Unfortunately, after several relocations, I had discarded the bobble hat, so I was panicking in search of one.

When I decided there was none to be found, I rummaged through my fabric stash and decided, what the heck, I'll just wing it and make myself one.


I used the leftover fabric from making my Christmas stockings - perfect red and white stripes! - cut out two domed shaped pieces and sewed the edges together with a 1/2 inch seam allowance.


Ta-daa!

This was quite easily done in 5 minutes..
I don't know what the final count is but it sure was a great night out!


Sunday, December 23, 2012

Crafting : Tis the season to be gifting!


Made a whole bunch of Christmas coasters for the co-workers.


Some more home-made ornaments for the tree


My intention was to embroider Christmas cards this year. But I only got done with one. 
And that was a birthday card for my pug-loving friend. Next year I'll start early!


2 more days to Christmas!!


Saturday, December 15, 2012

Crafting : Martha Stewart's Christmas Stockings

Martha Stewart sent me an email. Oh-kay. Martha Stewart DOT com sent me an email, with a tutorial on how to make Christmas stockings. And just in time too, because this is Scuffy's first Christmas, I wanted to make stockings for our little Russell family.


This is the tutorial for her Christmas stockings. But I decided that I didn't want to make mine out of felt, so I hopped over to the craft store to get some pretty Christmas fabric and trimmings, and they were on 50% sale!!

IMG_8139

I also added batting to my stockings, just because i like soft squishy ones.

And some pom-pom trimming to make it fun!

IMG_8142

Ok, so the stockings didn't turn out to be too spacious, i think we can only stuff it with candy canes and perhaps gift cards. But, they look pretty neat on my hat rack!

Yay for quick and easy Christmas crafts!

Tuesday, December 11, 2012

Crafting : Scrapbuster Pinwheel Quilt

Today I'm going to share my next December craft - a square lap quilt for cosy nights, hot chocolate and reading by the fire!

In this quilt:

1. I tried out the traditional pinwheel quilt pattern.
2. I made my own binding (2nd to date!)
3. Attempted mitered corners!
4. I refined my quilting techniques such as minimizing bunching up as I laid out my quilt sandwich.
5. This project is a good scrap buster! I used up a good bit of my scrap fabric lying around.


IMG_8007

Assembling the pinwheel squares:

1. I cut out 72 pieces of 3 7/8" squares of plain fabric and 72 pieces of 3 7/8" squares of printed fabric.

2. Take one plain square and one printed square and align them with right sides facing.

3. Draw a diagonal line on one of the wrong sides of this pair of fabric.

4. Sew 1/4" away on both sides of this diagonal, and then cut the fabric down the diagonal.

You should get 144 squares made up of one plain and one printed fabric. This is your basic block. Now arrange them to your taste by putting 4 blocks together to create a pinwheel block, like the ones pictured above. You should end up with 36 pinwheel blocks.


IMG_8010

Now to assemble the quilt top (all with 1/4" seam allowance):

1. Stitch 6 pinwheel blocks in a row. You will have 6 rows.

2. Then stitch the rows together. You will end up with a square quilt top, 6 blocks by 6 blocks.


And then assemble the quilt by laying the batting between the quilt top and the quilt backing, like a sandwich. The quilt top and quilt backing should have their right sides facing out.

I've learnt from past experiences to safety pin my quilt sandwich at regular intervals, all over the quilt, to prevent the batting from bunching up on the inside.

When you are sure you got your quilt sandwich laid out as flat as you possibly can, you can proceed with stitching the sandwich together to secure the batting in place.

IMG_8019

I have chosen to stitch-in-the-ditch by sewing over the existing stitches of my blocks, so it looks like this on the back.


IMG_8031

Align and pin the binding so the raw edges meet the edges of the top of the quilt. Start the binding on one side of the quilt, but in the middle. Leave a tail of about 5" to 8" on both ends, but leave about a 3" gap between the binding tails. Like in the picture above.


Here I'm going to attempt to explain how I miter my corners. Remember this is my first attempt:

IMG_8034

When pinning the binding to the quilt top, leave an excess triangle when you come to a corner. This will give you enough binding to work with when you flip the binding over to the back of the quilt. Pretend you are pinching a triangular corner.

Once the pinning is done, sew the binding to the quilt top with a 1/4" seam allowance. When you reach the end, lay the two tails flat on the quilt and mark where the two ends meet. Sew the binding together (not on the quilt) at the mark, and trim off excess. Then sew the binding onto the quilt, like before, with a 1/4" seam allowance.

Trim excess batting bulk before turning the binding to the other side. I find pressing the seams as I flip the binding helps a lot!


IMG_8037
Here's how I attack the corners. Attempt one side of the quilt at a time!
Press and fold one side of the binding down first.


IMG_8038
Then press and fold the other side down. It should fall in place nicely!


IMG_8039
Secure with binding clips ( or in my case, hair clips!) Then carefully hand sew, with slip-stitching, the binding to the back of the quilt!


IMG_8042

Ta-daa! I'm ready for the cold winter nights!


Linking up to some crafty fun here!


Friday, December 7, 2012

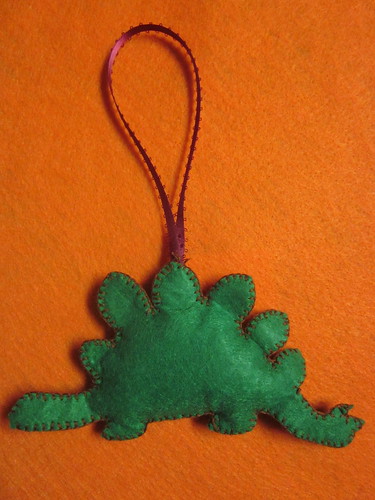
Crafting : Christmas tree Felt Ornaments

Holy guacamole! It's December already!!

I haven't been wasting any time, and have been busy crafting gifts for this holiday season, although I have a feeling I'm about to run out of steam soon! For today, I'll share my first craft of December - Christmas tree ornaments for the 3 adorable kids I help babysit.

I love felt crafts. Here is an easy one you can attempt, if you're looking for quick and easy gifts to make.


IMG_8062

1. Make a template out of cardstock. I got mine off the internet - santa, T-rex, and owl. You can also draw your own!

2. Trace the template onto the different colored felt pieces and cut them out.

(Now I know not all the templates I provided are templates with individual pieces. With the Santa picture, I used it as a guide to draw my own template freehand.)

3. Arrange the felt pieces in a satisfactory manner, and decide how you want to attach them. I used a combination of stitching and hot glue.


IMG_8064

Take the T-rex for example. It is only made of 2 main pieces, so I decided to blanket stitch all around. Starting in the middle at the top, I attached a ribbon (for hanging on the tree) to the felt using needle and thread, and started my blanket stitching from there.


For the Santa, I used running stitches for his eyes and mouth, before blanket stitching his beard together. This way you can hide your stitches on the inside! Then I used the glue gun to hot glue his nose to his face, and his face to his beard. Use your own discretion when putting the pieces together.


4. Finally, if you like, you can add a little stuffing to give your ornaments a 3D effect!

IMG_8069

IMG_8070IMG_8071


These ones are ready to be tossed into their goody bags! I also added fun stuff like bubbles, activity/story books, kiddy snacks and stickers! Can't wait to watch them hang their ornaments on their tree!

I'm going to make some more for our Christmas tree (when I get a break)! Meanwhile, have fun making yours!


Oh and I'm doing a button swap with Melissa Ashley of the 25th Hour. Go check out her page if you're interested in doing a button swap too!


Linking up here too! Come join the crafty fun!


Sunday, November 11, 2012

Crafting : Travel map garland


Via

No, that's not the garland I made for my sister's wedding, although it's real pretty!

Mine's even simpler -- it can be done in 1-2-3 easy steps!

You'll need:

Old maps
Ribbon / twine
Pen-knife (Exacto knife)


IMG_7046

(1) Create a template of the shape you want your garland to be. I made triangles, but you can just as easily make hearts, or any other shape you fancy.
Trace template onto a map, and cut them out. I couldn't get a hold of older vintage looking maps, so I used an old street directory my dad wasn't using.


IMG_7049

(2) About one inch from the base of the triangle, I used a pen-knife and made two tiny slits about an inch apart.
This is for you to thread your ribbon/twine through to string the triangles together.


IMG_7054

(3) Thread all your shapes together, and get ready to hang your garland up!


With all the holidays around the corner, this is such a simple but great way of sprucing up your home for the festive season! You could use wrapping paper in place of the maps, and cut out some simple Christmas tree / candy cane shapes and string them up! Q.E.D!


Sunday, November 4, 2012

Crafting : Owl Wings and Mask tutorial

Here is a list of Halloween costumes I had in mind:

1) Gypsy fortune-teller
2) Geisha
3) Bird / Owl
4) Fairy


I had my heart set on making my fortune teller outfit, I even bought a caftan pattern from Etsy to make my outfit!! Then i chickened out of the pattern :(

But then i found this easy-to-make Owl wings tutorial on Burda Style, and I figured I could easily make an owl mask. So that was decided!


IMG_7821IMG_7825


To make the mask, you'll need:

2 pieces of brown felt
Scrap Yellow felt
1 piece of sturdy interfacing
Coordinating colors of embroidery floss
Embroidery needle
Hot glue gun
Head band


1. I drew a template of an owl mask, alternatively you can google owl mask templates,
or get one from the Martha Stewart website
Via

2. Trace the template on the brown felt and on the interfacing
to cut out three owl mask shapes. Like so.

IMG_7744


3. Sandwich the three layers so that the interfacing is in between the two pieces of brown felt. Pin the layers together.
Then thread your embroidery floss and blanket stitch the three layers together, all around the edges. I love using the blanket stitch because it a pretty stitch but it binds layers together very well! Functional and aesthetically pleasing.
I also used a running stitch to add a little outlining detail to the mask. You'll want to use a thicker needle and 6-count embroidery floss. Pushing the needle through 3 layers of felt and interfacing and be quite a challenge!

IMG_7746


4. Attach the head band to the mask using a hot glue gun.
Press and hold head band in place until the glue dries.
Now, where you place your head band is a matter of personal preference.
I attached my band in the middle of the mask above the eye holes because after playing around with different placements, this was most comfortable for me.
You should experiment too, before permanently attaching the band to the mask.

IMG_7748


5. Cut out a diamond shaped beak from the yellow felt. Leave one of the edges slightly rounded or plateaued. Hot glue this piece onto the bottom of the mask where the beak goes. Ta-daaa!! And you're done!

IMG_7749


IMG_7823

Now go be a HOOT, and take someone under your wing! *guffaws*
(Insert your own owl joke here for laughs)
And I'll be the gypsy fortune teller next year!


Thursday, October 25, 2012

Day Trip : Carolina Renaissance Festival!

IMG_7704


Huzzah!!

The Renaissance Festival is back! Lots of tankards of mead and turkey legs to be had. This is my first visit and I LOVED IT! There were lots of visitors who actually dressed up in their Renaissance costumes for the fair! If only I'd known!! Next year I want to dress up too!


IMG_7670

Do you believe in fairies? I just spotted one!


IMG_7655

My favorite shop - the craftsman makes beautiful one-of-a-kind dream catchers, wooden kaleidoscopes and other glass trinkets!! I had my eye set on a Dark-Side-of-the-Moon prism dreamcatcher but it was out of my budget... oh well. I hope some lucky guy picks it out!

There are lots of craft stores, activities, and performances going on at all times. Go to their web page to check out their list of events.


Weekends only, 10:30am-5pm, now till Nov 18th, 2012!
16445 Poplar Tent Road, Huntersville, NC 28078

Wednesday, October 17, 2012

Crafting: DIY Tissue Paper Pomanders


IMG_7467

Alright here's the low-down on the tissue paper pomanders : they are super easy to make, but they are very time consuming. Especially if you are making them in large quantities, or making a huge-ass pomander.


Materials:

An 8" or 10" styrofoam ball
White tissue paper
Gauge wire
Acrylic paint
Spray bottle
Scissors
Wire cutter
Hot Glue gun and glue sticks


First, get ready to make a gazillion tissue paper flowers before we even try to make a pomander. So:

IMG_7427

(1) You will need tons of tissue paper cut into rectangles measuring 5" by 10". Each flower is made up of 4 layers of 5"x10" rectangles. I stack 4 pieces of tissue paper at once before cutting them into the rectangles.

(2) Then you need to accordion fold each stack of 4 rectangles. Each fold measures about
1/2" - 5/8" depending on how you like your flowers.
Experiment with a few to help you decide!


(3) I use clothes pegs to keep my accordion folded stacks neat and tidy while I continue to fold more rectangles.


IMG_7578

(4) Cut a piece of 6" gauge wire, wrap it around the middle of the folded tissue paper, before twisting the two ends together, like in the picture above.

(5) Rounding the edges of both sides of the tissue paper will give your flower a softer look.


IMG_7579IMG_7583

(6) Carefully peel the layers away from the wire, towards the middle, one layer at a time.

(7) When all four layers are peeled and fluffed up, trim the gauge wire to about 1.5" - 2" long. You really don't need a very long stem!


I used white tissue paper because I couldn't find pink / coral tissue paper in large quantities. But the good thing about using white tissue is that you can virtually make ANY color pomanders to suit your needs.


IMG_7586

(8) I mixed some pink acrylic paints with water in a spray bottle, shake to mix well, then proceeded to spray ALL my flowers individually. I kept my flowers in the bathroom, next to a space heater so they can dry more quickly!


When you have all your flowers ready, you can start to make your pomanders. I bought my 8" and 10" styrofoam balls from Michaels (a craft store). Here, a glue gun will be very useful!

For demo purposes, I have used a spare tiny styrofoam ball for show because I forgot to take pictures while making the real thing.

IMG_7588IMG_7590

(9) To make the ribbon loop for hanging the pomander, cut another piece of wire about 6" again. Cut your desired length of ribbon, knot in the middle to the wire. Again, trim the wire to about 1.5"-2".

(10) Push the wire into the styrofoam ball and hot glue around the wire (and knot, if desired)


Now you can start sticking the tissue flowers into the styrofoam ball. An 8" ball will take about 40-45 flowers, and a 10" ball takes 60-65 flowers. For additional security, with every flower i push into the ball, i hot glue around the base to make sure the flower stays.

IMG_7450


Here are the results of the blood, sweat and tears! Ta-daaa!!! It took me a week to make four 8" pomanders and two 10" pomanders. Hope this was useful!


Related Posts Plugin for WordPress, Blogger...